Experiment
The Experiment Module enables users to seamlessly train and evaluate machine learning models using curated datasets produced by pipelines. With access to a wide range of algorithms and pretrained models, users can quickly choose the best approach for their use case.
The module also provides a powerful interface for managing experiment runs—making it easy to track performance, compare results, and version models for full reproducibility. This ensures faster iteration, greater transparency, and more reliable outcomes in the model development process.
Navigation to the Experiment Module
- From the left-hand sidebar, click the Experiment Module icon.
- This will open the Experiment Homepage, which lists all experiment runs initiated by the user, along with their key details.
Experiment Homepage – Run Details
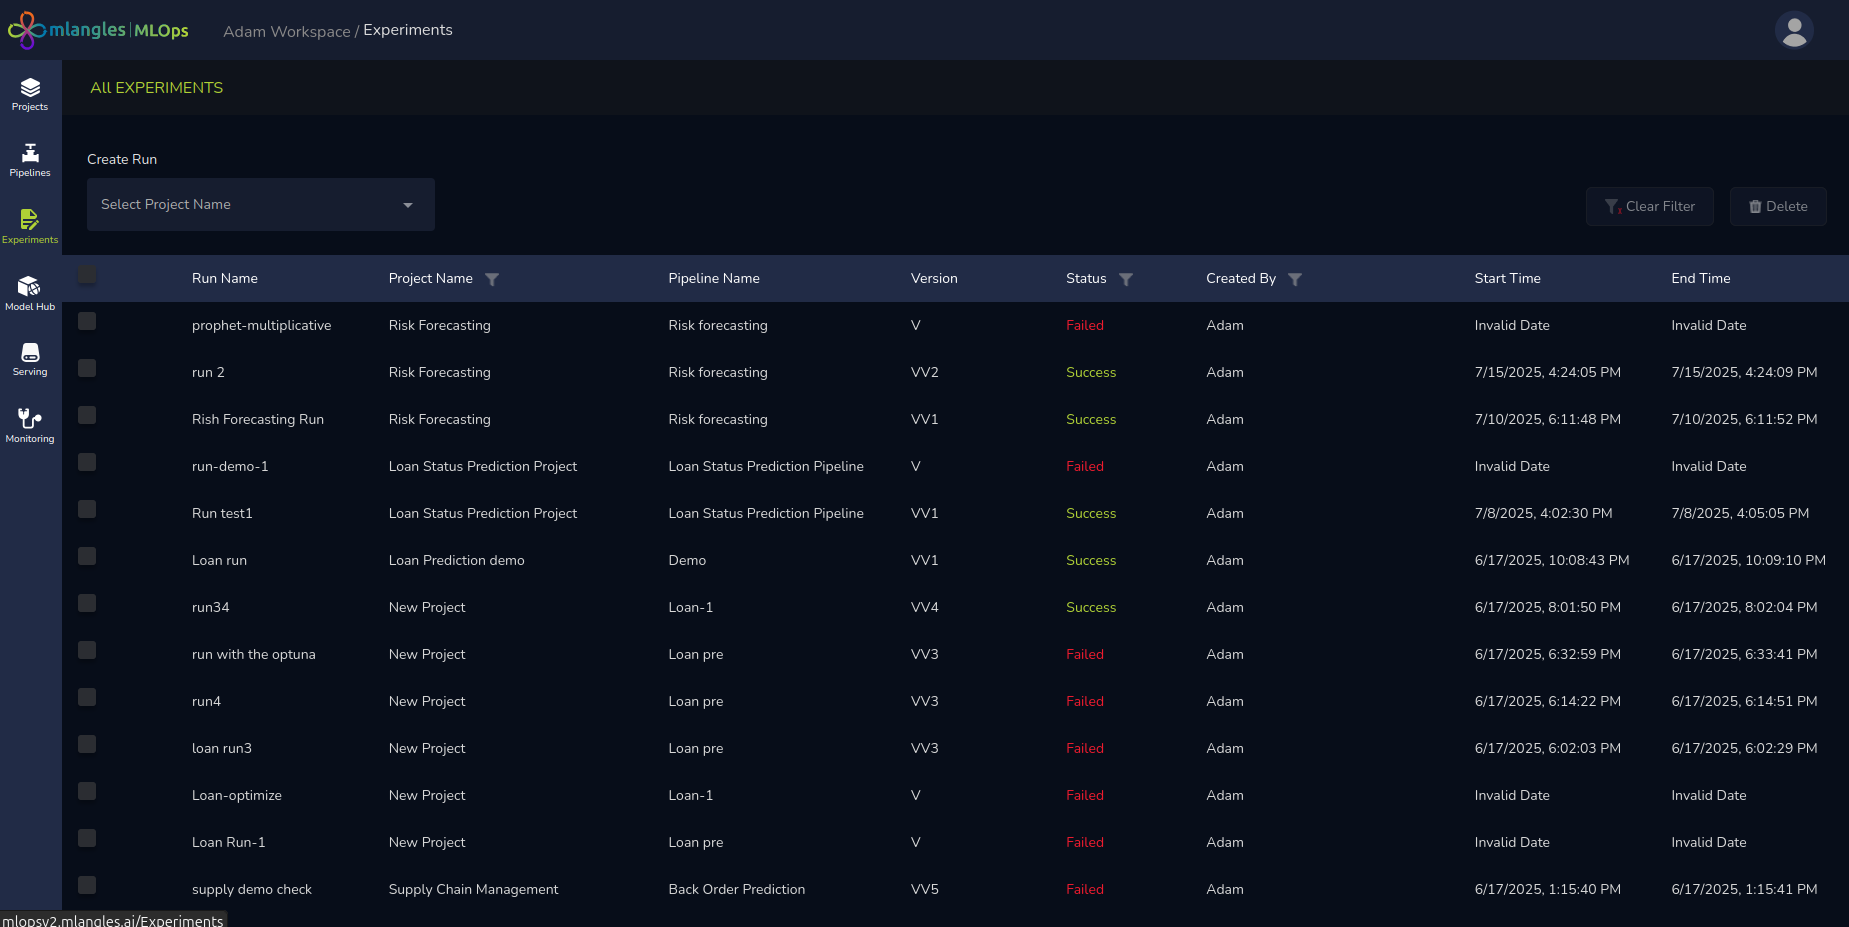
Figure 10 – Experiment Homepage
Each row in the experiment list contains the following information:
- Run Name – The identifier for the experiment run.
- Project Name – The project to which the experiment belongs.
- Pipeline Name – The pipeline whose transformed data is used for training the model in this experiment.
- Version – The version corresponding to executed pipeline data that was used for training
- Status – The status of the run:
- Success – Experiment completed successfully.
- Failed – Experiment encountered an error.
- Running – Experiment is in progress.
- Created By – The username of the person who initiated the run.
- Start Time – The timestamp indicating when the experiment began.
- End Time – The timestamp indicating when the experiment finished.
Creating New Experiment Runs
There are two ways to initiate a new experiment run:
- Via the Experiment Module Homepage
- Use the Project Selection dropdown located above the experiment table to choose the desired project.
- Click the + New Run button to navigate to the Experiment Run Design page.
- Via the Project Workspace
- Click the Project Title Card of the desired project.
- Select the Experiment Tracking tab.
- Click New Run to be taken to the same Experiment Run Design page.
Creating an Experiment Run
When the user clicks on Create Run, the system navigates to the Experiment Design Page. This page serves as the main configuration interface for setting up and launching a new model training process. It is divided into multiple logical sections, ensuring that users—from beginners to advanced practitioners—can configure their experiment runs efficiently and accurately.
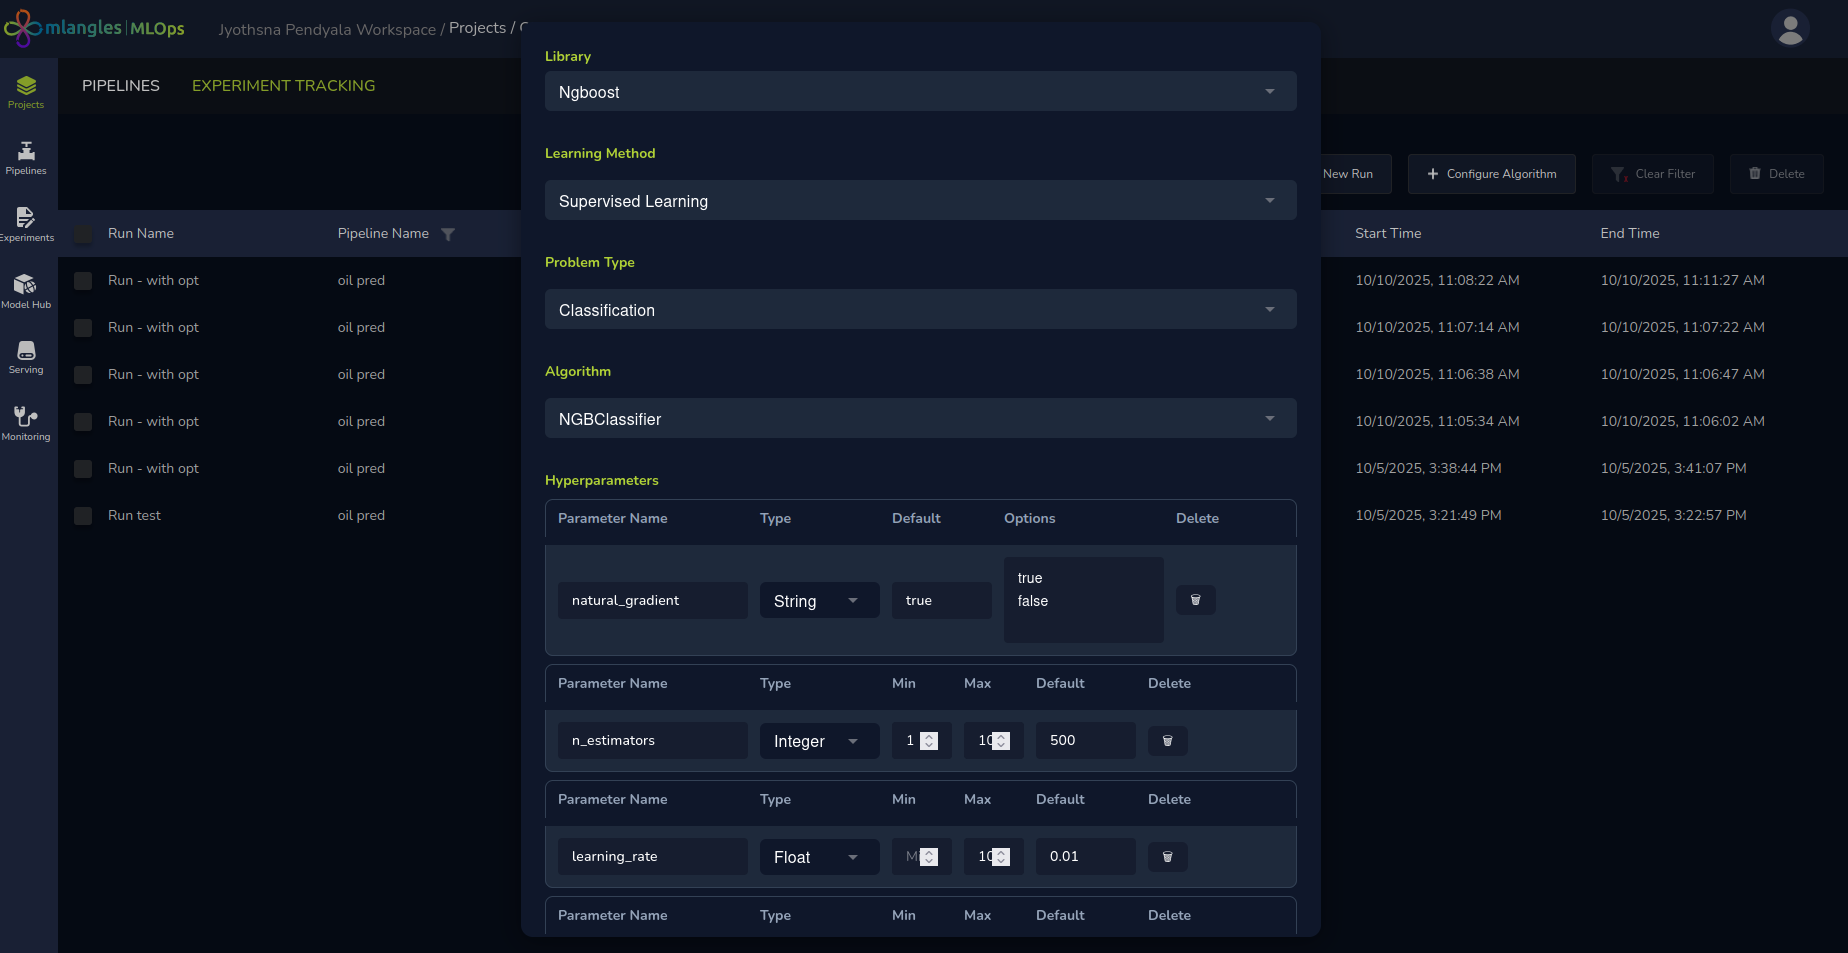
Figure 11 - Configuring a new algorithm
Note : For advanced users, the platform allows extending the set of available algorithms by importing from external libraries.
Before creating a new experiment run, users can click the Configure Algorithm button, select the desired library and algorithm, and then click Submit. The newly added algorithms will then be available for selection in future runs, enabling greater flexibility and customization in model training.
Basic Experiment Setup
An experiment run refers to a single training process where the user selects the models and algorithms that they would like to train. Every run consists of one or more models and algorithms that can be used.
The first step is to provide the fundamental details for the experiment run:
- Run Name – A unique and descriptive name for the experiment run. This helps in identifying and differentiating between multiple runs under the same project.
- Pipeline and Execution – The user must select the appropriate pipeline and its corresponding execution instance. This selection determines which transformed dataset will be used as the input for model training.
Auto Filled Recommended Parameters
Once the pipeline is selected, the system’s integrated custom Large Language Model (LLM) analyzes the pipeline’s transformed metadata and automatically suggests a set of recommended default parameters for the experiment run. These pre-filled parameters include:
- Learning Method – Automatically set to Supervised, Unsupervised, or Deep Learning based on data characteristics. Supervised for data that has the ground truth predicted values to learn present in the training data. Unsupervised algorithms are selected when no clear ground truth is available. Deep learning is used for training image and frequency-based data.
- Problem Type – Suggested as Classification, Regression, or Time Series, depending on the training objective. Classification problems are used to predict discrete labels based on input data. Regression and time series both predict a continuos value based on input data.
- Target Variable – The specific variable or feature that the model will predict.
- Computation Power – Recommended CPU/GPU and memory resources needed for efficient model training.
- Model Definition & Hyperparameters – A default model architecture along with optimized hyperparameter settings. Hyper parameters are different parameters that are used to tweak the model complexity and learning performance on the training data.
- Model Storage Destination – The location where the trained model will be saved after the run is completed.
These defaults are intended to accelerate setup and ensure that even less experienced users can quickly launch a well-configured experiment.
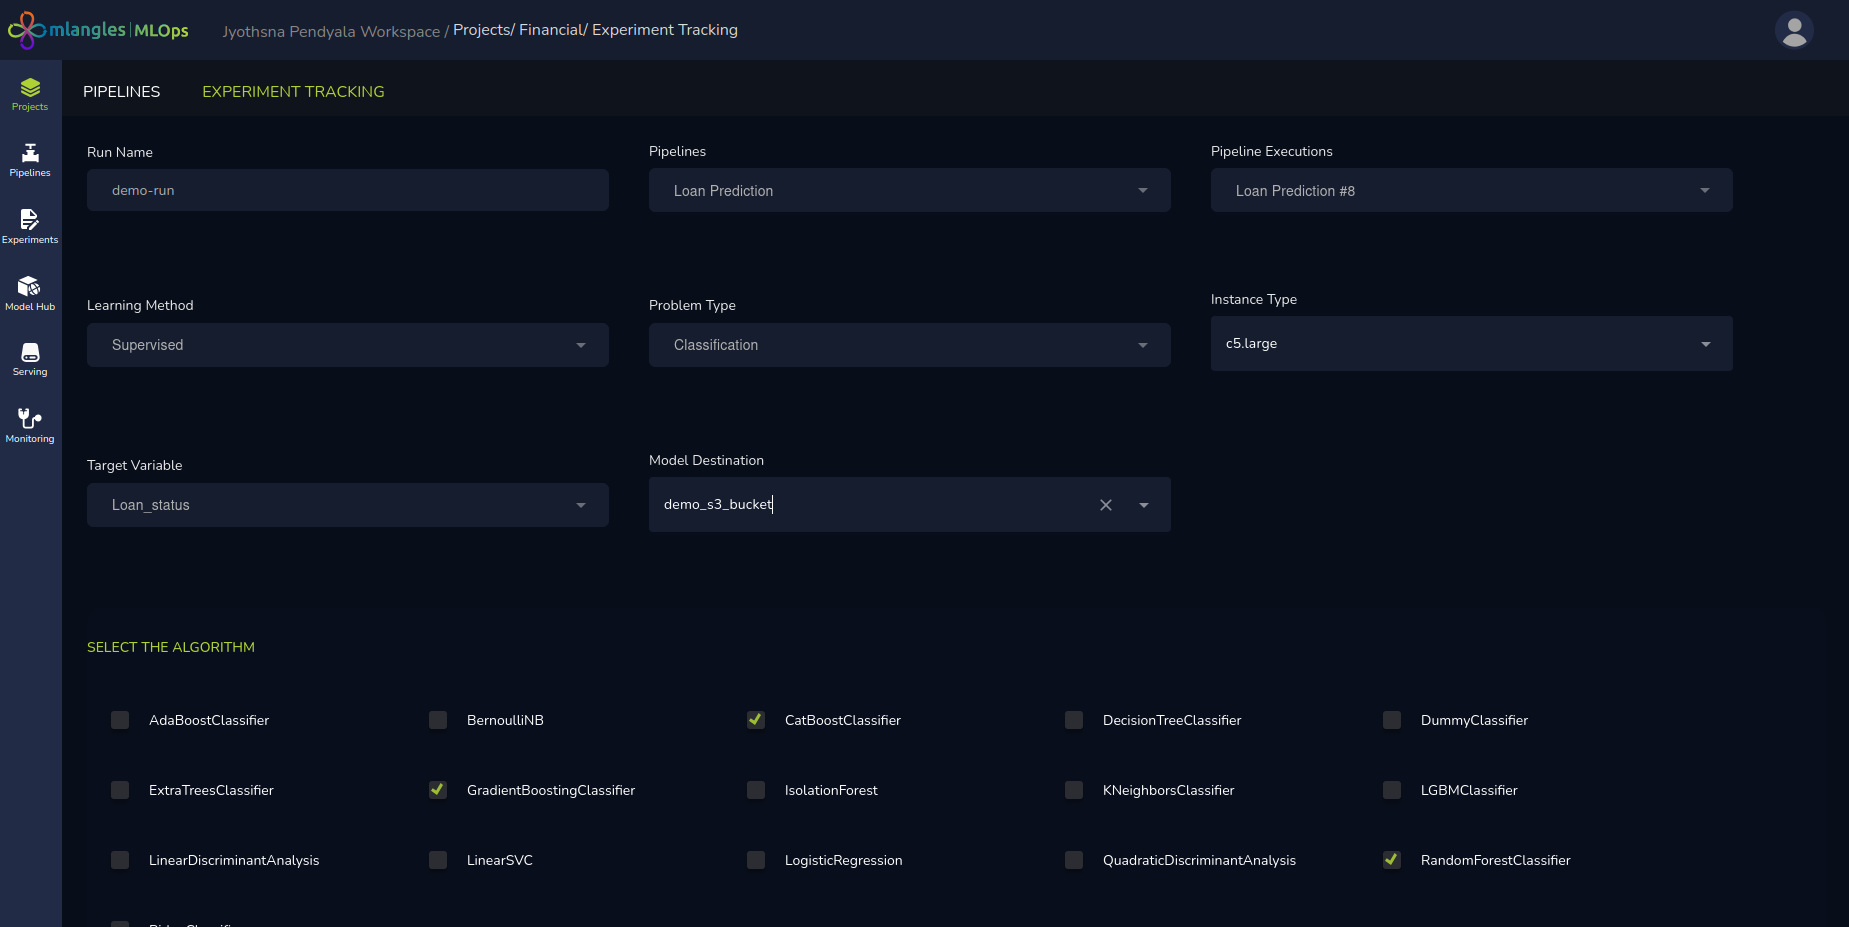
Figure 12 – Classification model training new run ( no hyperparameter tuning)
Advanced Hyperparameter Tuning (Optional)
For advanced users who wish to have greater control over the training process, the platform provides manual hyperparameter tuning capabilities. Options include:
-
Optuna – An efficient, automated hyperparameter optimization framework.
-
Hyperopt – A library designed for distributed asynchronous optimization.
-
Grid Search – Exhaustive searching over a specified set of hyperparameter values.
When performing hyperparameter optimization, users must specify the range or set of values for each hyperparameter they wish to tune, along with the number of trials to run. The selected libraries then explore different permutations and combinations of these hyperparameters across the specified trials. After completion, the system returns the combination that achieves the best performance metric—such as highest accuracy or lowest error—helping users identify the optimal configuration for their model.
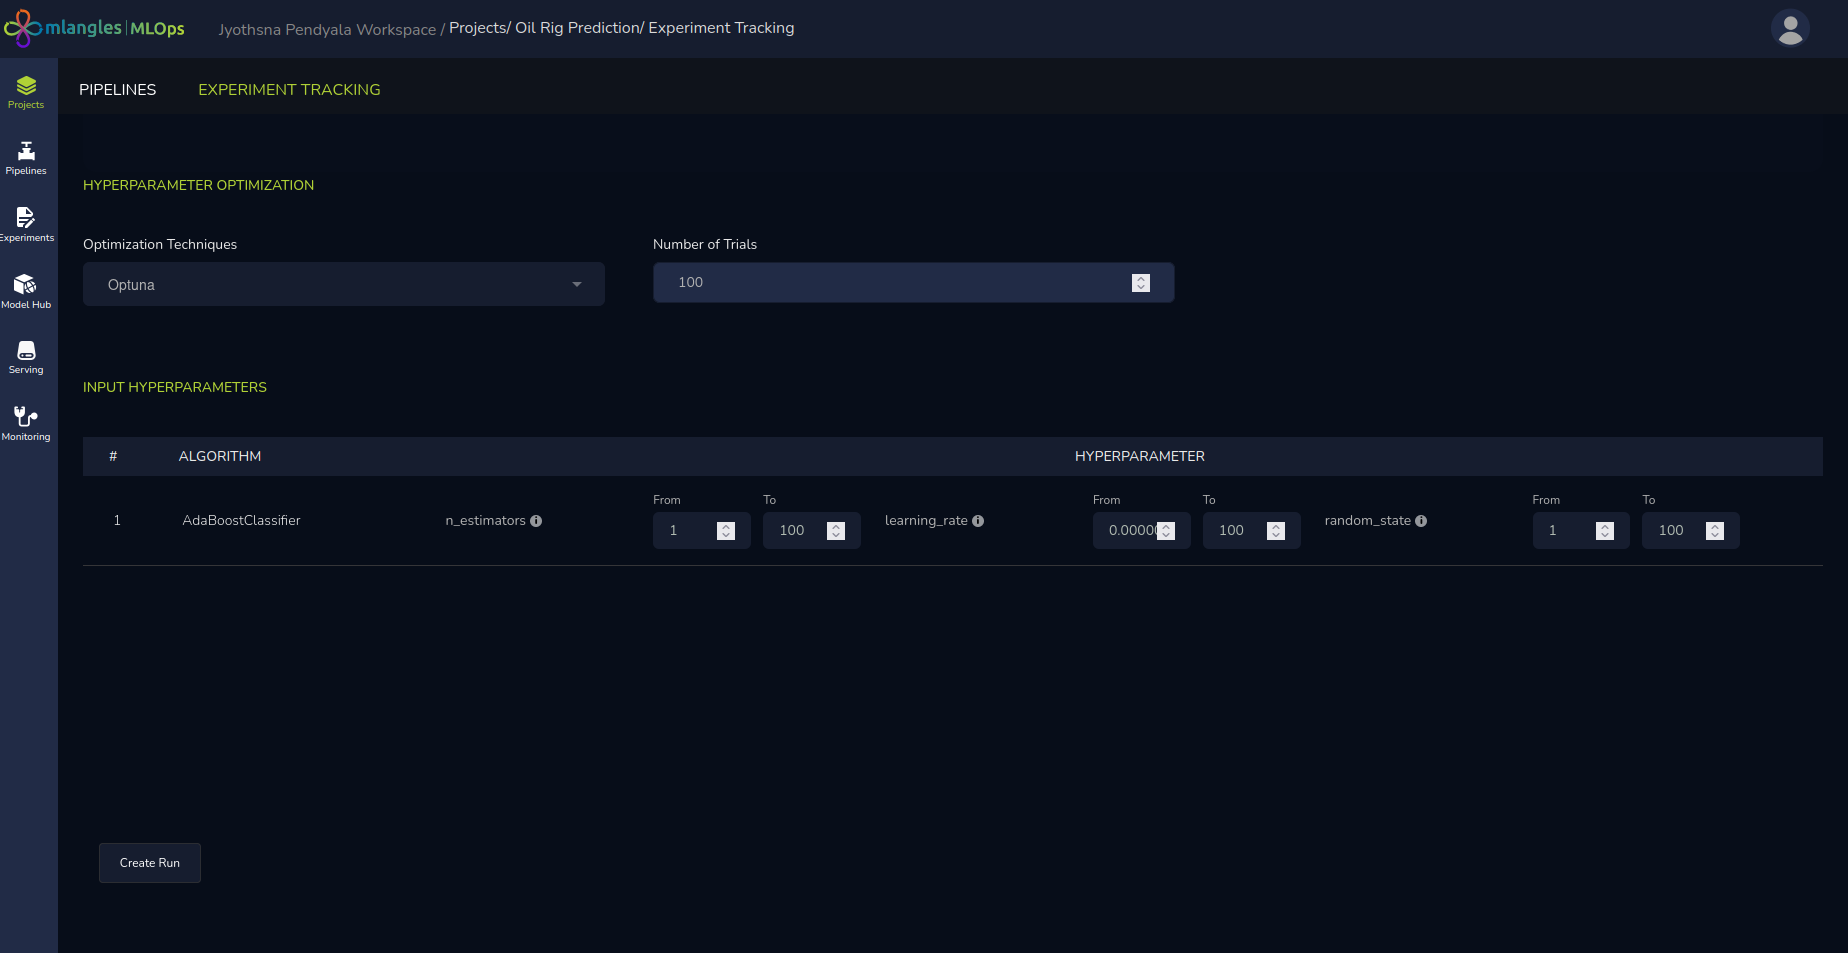
Figure 13 – Hyperparameter tuning
Extended Features for Deep Learning Models
If the chosen Learning Method is Deep Learning, additional configuration options become available:
- Domain Selection – The user selects the model’s domain:
- Images – For CNN (Convolutional Neural Network)-based architectures which are the standard for training on image data
- Tabular Data – For feedforward neural network models which are a combination of connected layers of neurons.
- Problem Type – The specific machine learning task (e.g., classification or regression).
- Architecture Options – Users can choose from:
- Transfer Learning – Using a pre-existing, pre-trained architecture to accelerate model training.
- Custom Model – Building the model architecture from scratch, layer by layer.
- Hybrid Approach – Extending a pre-trained model by adding custom layers for problem-specific tuning.
- Mandatory Deep Learning Parameters – Users must specify:
- Epochs – Number of complete passes over the training dataset.
- Optimizer – The algorithm used for weight updates during training (e.g., Adam, SGD).
- Loss Function – The metric that the model will minimize during training (e.g., cross-entropy, MSE).
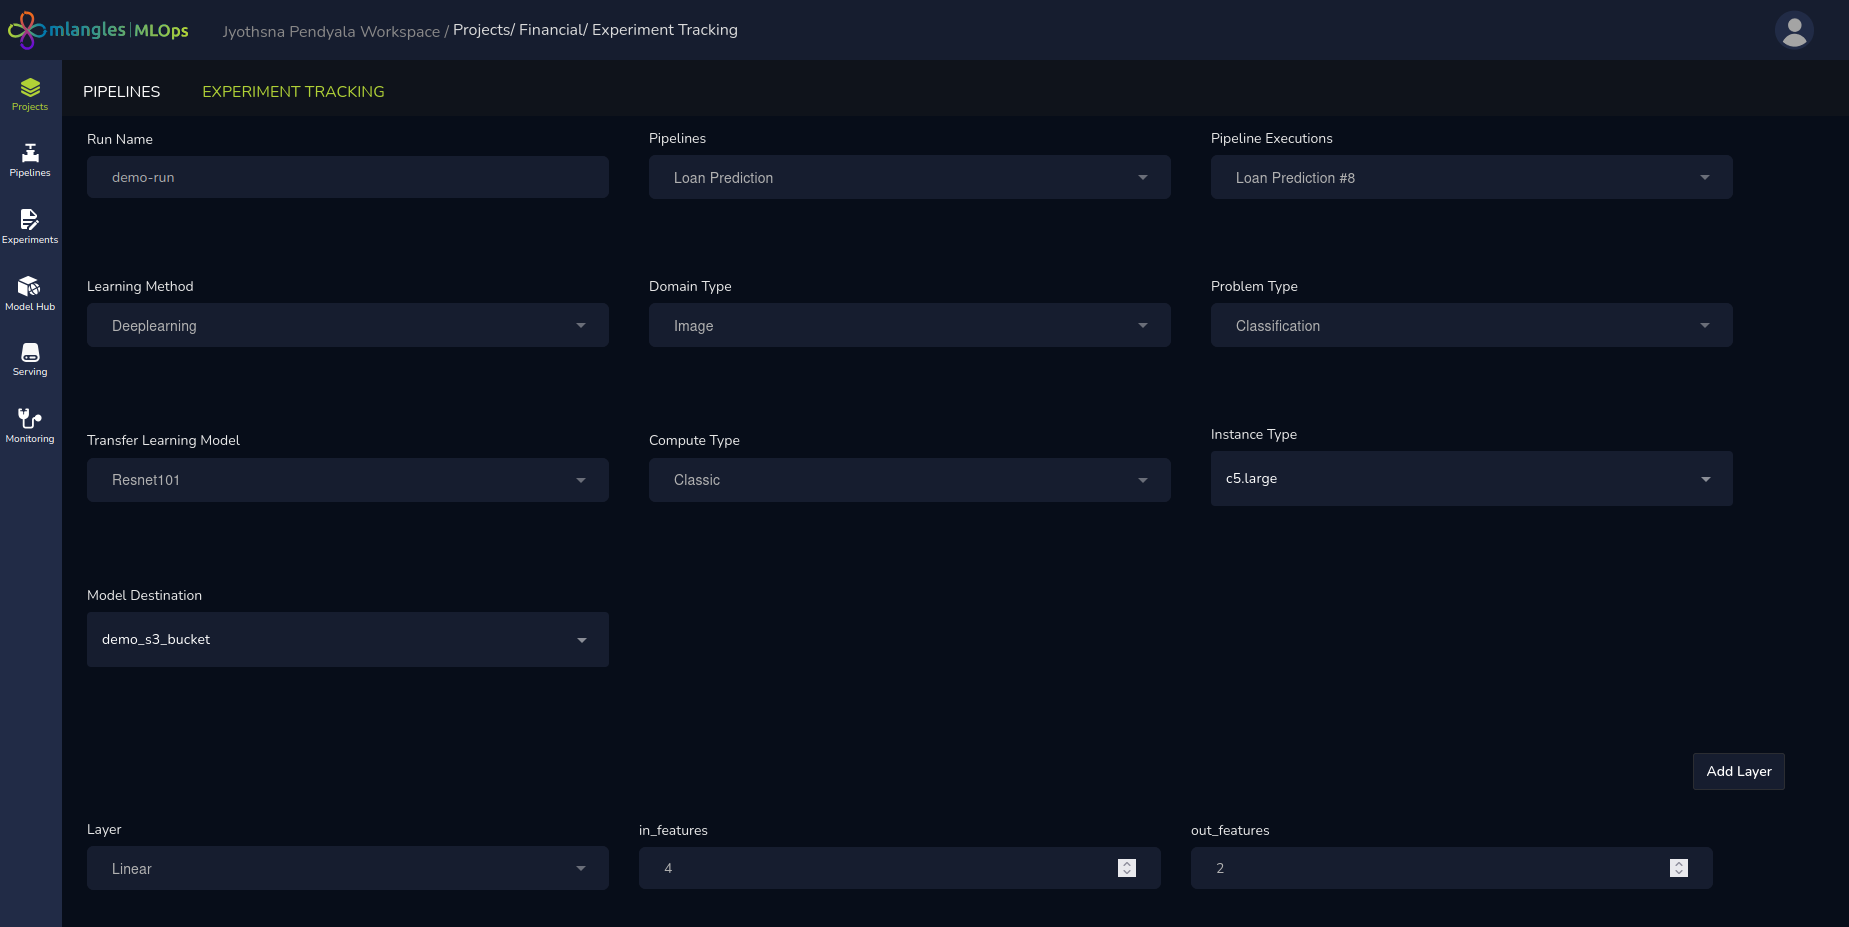
Figure 14 – Deep learning new run
Executing the Experiment Run
After finalizing all configurations—whether using the default recommendations or fully customized settings—the user proceeds as follows:
- Click the Submit button to initiate training.
- The system queues the experiment in the scheduler for execution.
- The user is automatically redirected to the Project’s Experiment Page, where they can:
- Monitor real-time progress.
- View logs and status updates (Running, Failed, or Success).
- Access model outputs once the run completes.
Experiment Run Results
Once an experiment run has been completed, the user can review its outcomes in detail to evaluate performance, download models, and register them for deployment.
Accessing Experiment Run Details
To view the results of any experiment run:
- Navigate to the Project’s Experiment Page.
- Locate the desired run in the list.
- Click on the Run Name.
This action opens a details panel on the right-hand side of the screen, displaying multiple tabs containing run-specific information.
Tabs in the Experiment Run Details Panel
The details panel contains the following sections:
Parameters
- Displays the complete list of parameters and hyperparameters used in the experiment run.
- Highlights the model configuration that achieved the best performance among all trained models in that run.
Metrics
- Presents a table of performance metrics (e.g., accuracy, precision, recall, F1-score, RMSE) for each trained model.
- Enables side-by-side comparison of results to determine the most effective model.
- Selection of the best model and hyperparameter is done based on the highest average performance metric achieved by the shortlisted models.
Artifacts
- Provides download links for each individual trained model from the run.
- The download links allow user to download both model weights and model metadata such as architecture, hyperparameters etc.
- Offers the option to register a selected model to the Model Hub for deployment and consumption in downstream applications. Model Hub is a central hub for all shortlisted models that are green light for testing and deployment.
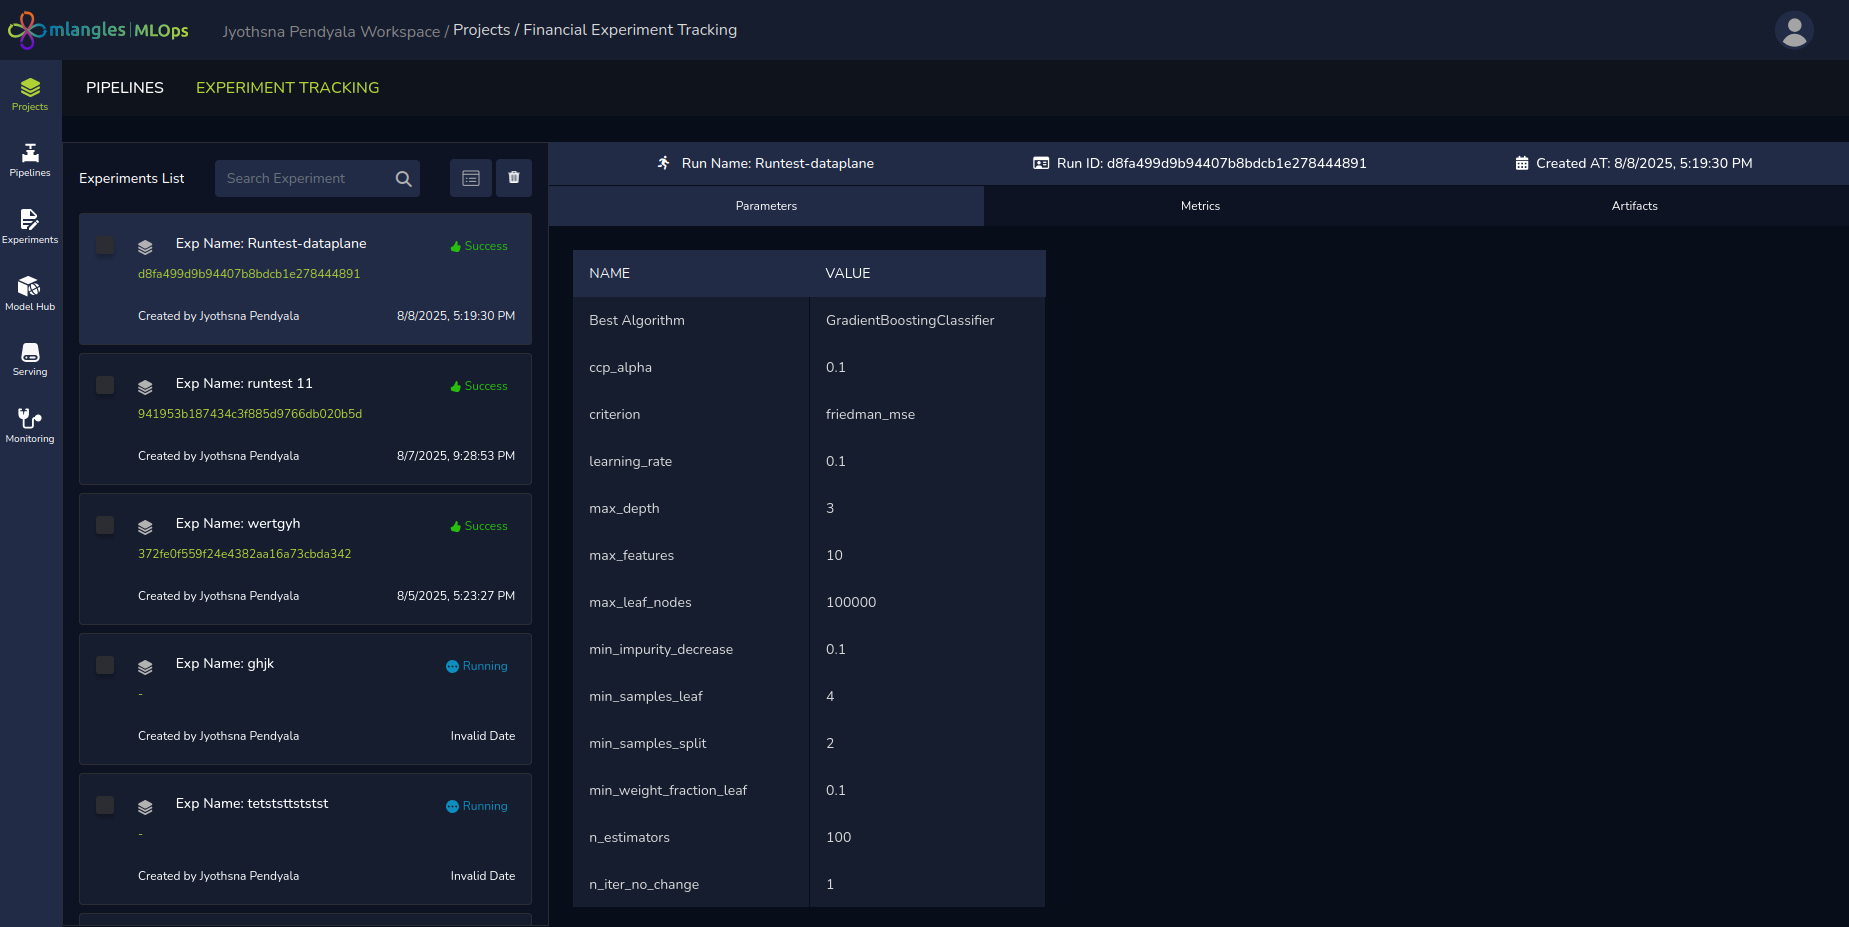
Figure 15 (a) – Experiment Run results
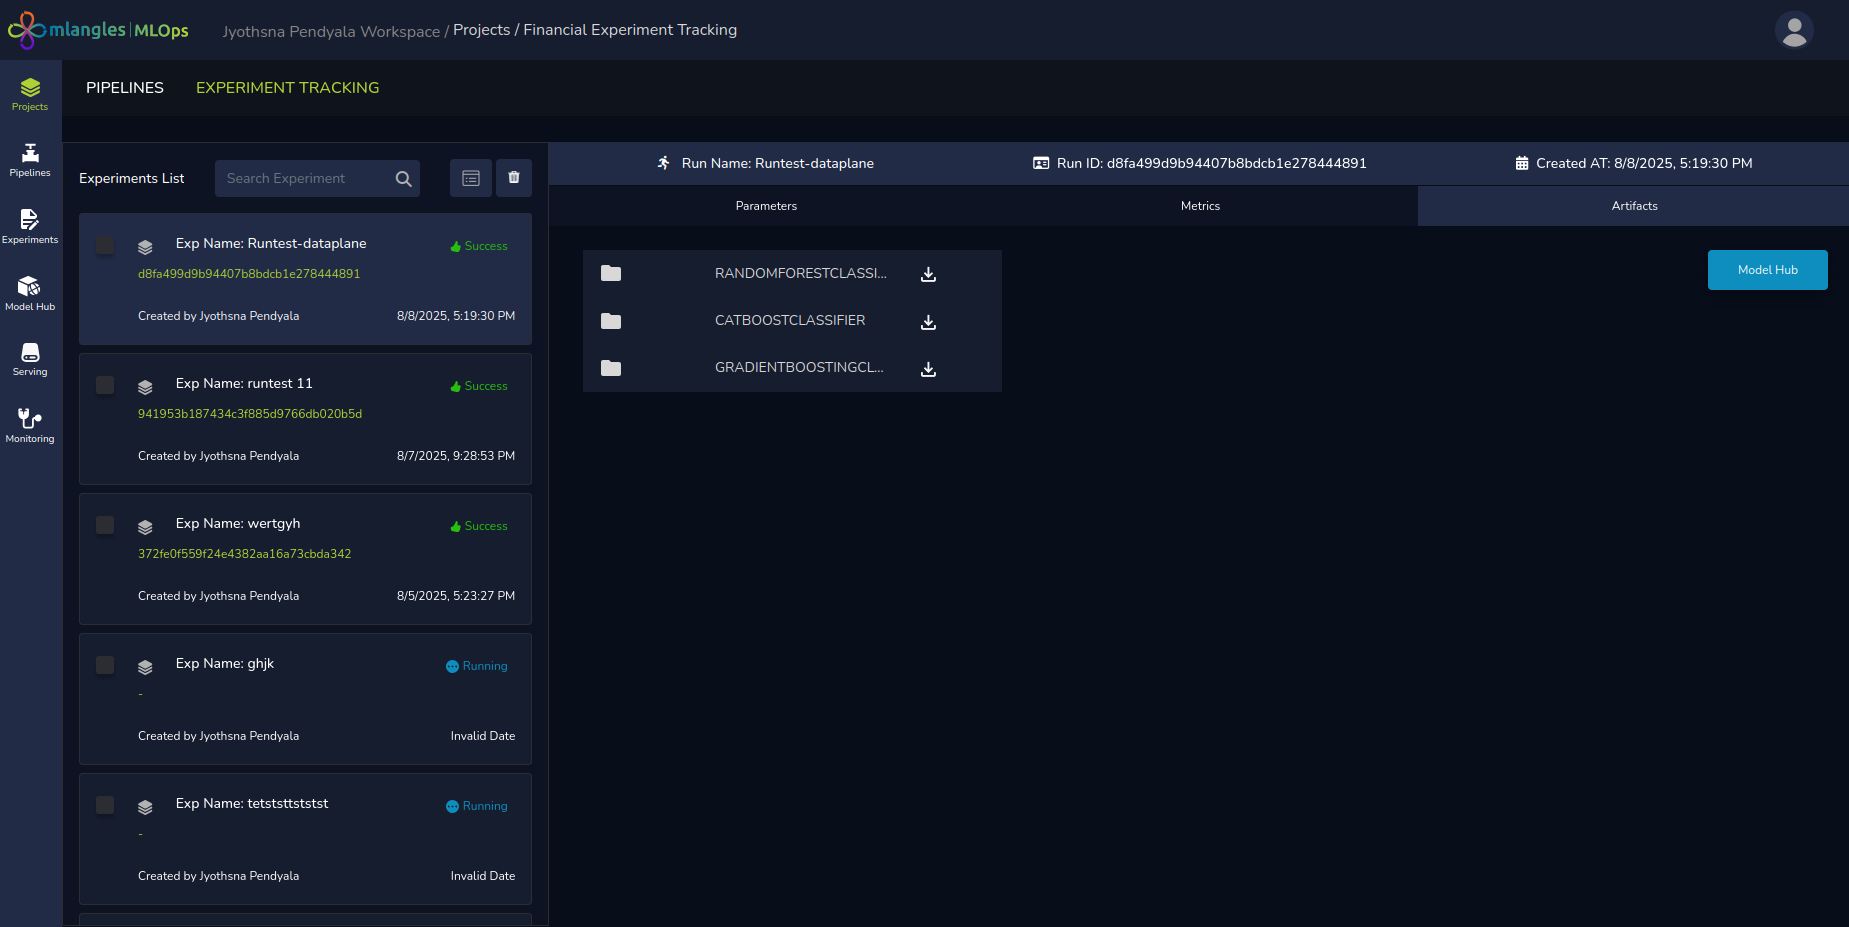
Figure 15 (b) - Experiment result artifacts
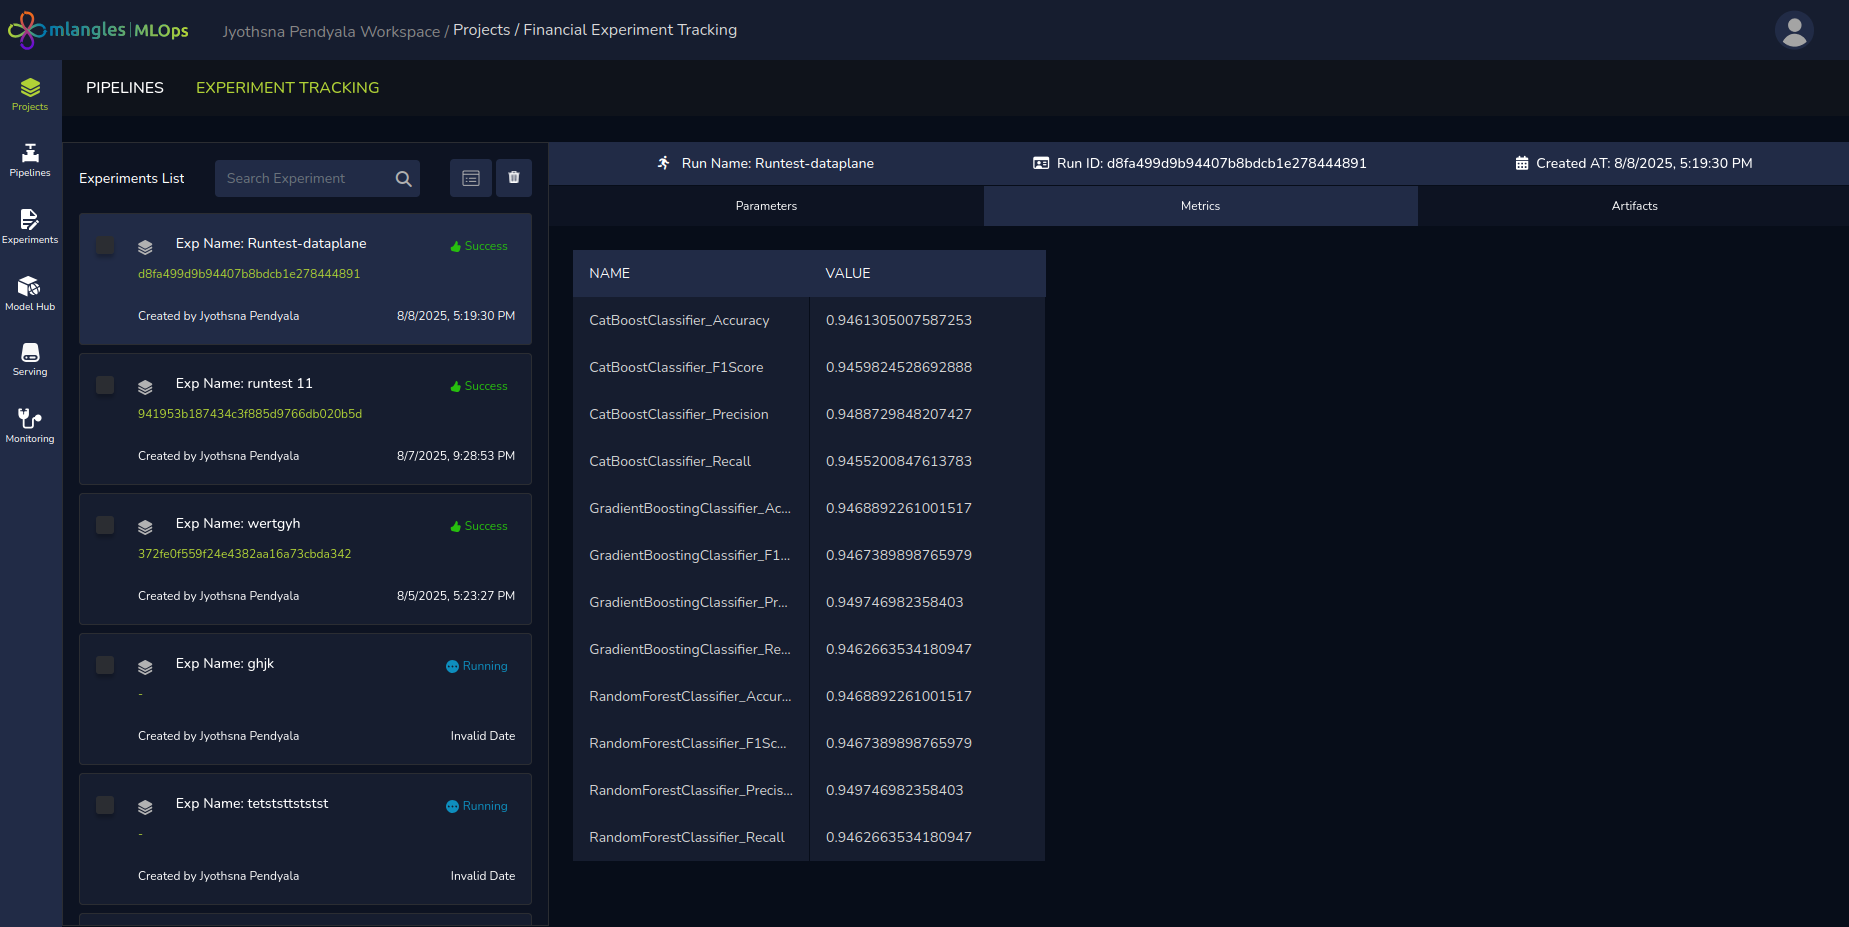
Figure 15 (c) - Experiment result metric values
Additional Tabs for Hyperparameter Optimization Runs
If the run involved Hyperparameter Optimization (via Optuna, Hyperopt, or Grid Search), two additional tabs appear:
- Logs – Displays detailed records of the optimization process, including trial progress and parameter evaluation.
- Graphs – Visualizes the impact of each hyperparameter on model performance, enabling deeper analysis of parameter importance and trade-offs. The user can also analyse different combinations and the effect on model performance during training.
Registering and Deploying a Model
Once the user is satisfied with a model’s performance then the next step for ensuring that the model is available for consumption is to register the model in model hub. The steps to do so:
- Navigate to the Artifacts tab.
- Click on the Model Hub button.
- A pop-up window appears, allowing the user to:
- Select the model from the list of all models trained in that run.
- Assign a Registration Name to the model.
- Click Register.
After registration, the model becomes available in the Model Hub Module for deployment into production or integration into applications.
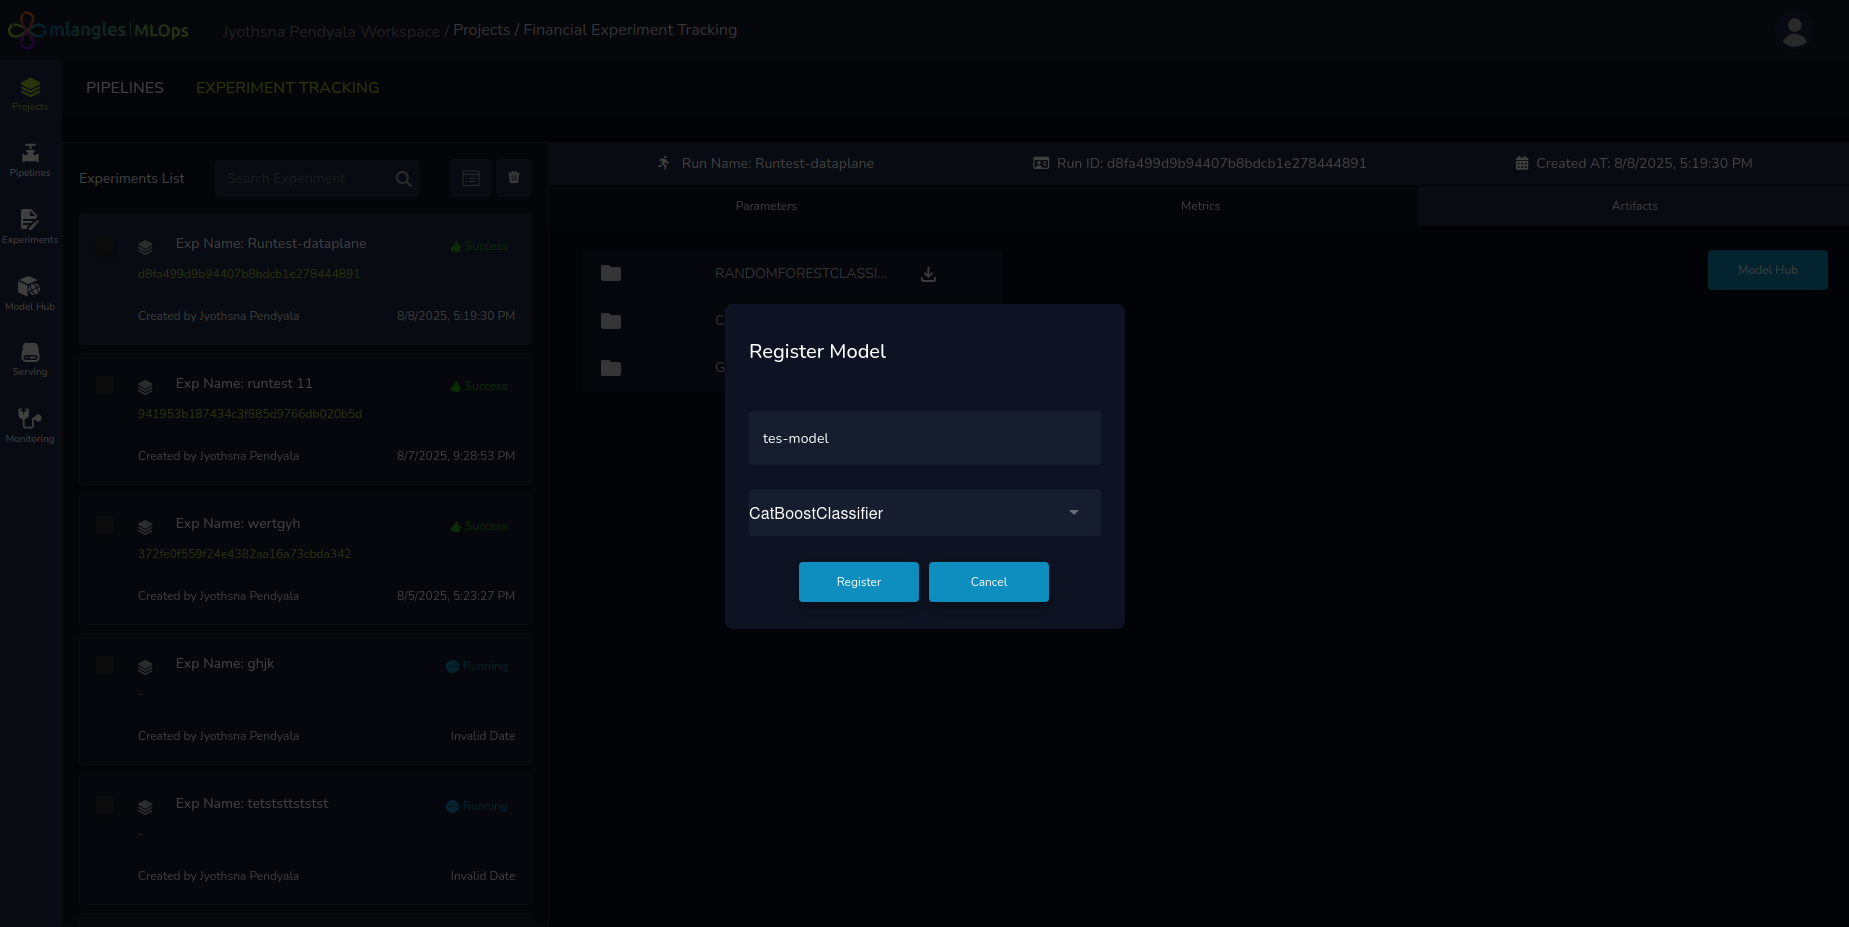
Figure 16 – Registering model to ModelHub